5. Importing sites
Importing sites in SharePoint 2010 at a granular level can be accomplished only through PowerShell.
Importing is akin to restoring the assets of the site. This can also be done for an item.
This recipe shows how to restore the site from the previous recipe.
Getting ready
An export sites file must exist.
The user must have access to one of the servers running PowerShell 2.0 and the user should be a member of the WSS_ADMIN_WPG group on the local computer. The user must also be a member of the db_owner database role and SharePoint_Shell_Access role in the following databases:
How to do it...
Click on the Start button on the web frontend.
Under All Programs, navigate to the Microsoft SharePoint 2010 Products folder.
Right-click on SharePoint 2010 Management Shell and click Run as Administrator. The PowerShell console will appear.
Type the following into the console window. Once the command is entered, press the Enter key.
Import-SPWeb http://domain/sites/ts/teamsite -Path \\server\backup\file.bak
How it works...
Importing can be a bit more perilous than exporting. There are several things to be aware of:
When importing a subsite, there must be a
template that matches the one being imported. It must already be
provided before trying to do an import.
For
a list, certain items can be imported. By default, the whole list is
imported, and if the list exists it will be overwritten. However, by
specifying -updateversions with the ignore parameter, only new items will be imported.
Just like the export, the import utility generates a
log file that can be looked into if the results do not meet the
expectations. This is located in the same directory as the backup.
6. Recovering data from an unattached content database
One of the new tools in an administrator's toolbox is
the ability to pull data from a database snapshot or from a detached
content database. The pulled data is then saved in a file. The data can
then be restored to a new location in a live database.
Administrators can minimize downtime and the
possibility of error when pulling content from one database to another.
Users can request data that may have been archived or lost through the
Recycle Bin process. This data can quickly be obtained.
The biggest gain from this type of granular restore
is that the content database does not need to be attached to a web
application, and recovery takes place outside of the attached instance.
Due to the separation of duties, the SharePoint administrator may not
have access to SQL Management Studio. With this, the administrator does
not need the SQL tool.
There are many ramifications of this capability in
the business process. All of this is predicated on the knowledge that
the content database has been backed up in some way and is archived
somewhere. Capability does not replace sound backup policies and
actions.
This recipe will show how to pull data into a file
from an unattached content database. The information can then be
imported into SharePoint via the import recipe.
Getting ready
You must have administrator privileges on the
SharePoint farm. There must be one available detached database. Lastly,
you need to have read permission to the unattached content database,
which may be different from the Central Administrator logged in user.
How to do it...
Open the Central Administration screen and click Backup and Restore.
The second section is Granular Backup. Under this section, click Recover data from an unattached content database.
The following page is displayed:
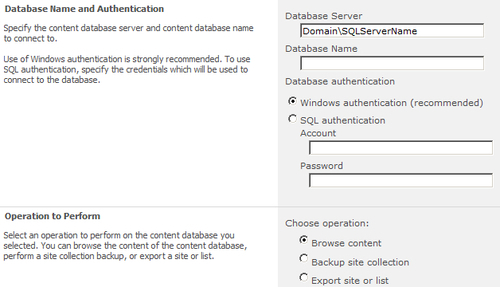
Fill in the required data.
Database Server: This is the name of your SQL Server instance.
Database Name: This is the name of your content database.
SQL authentication: Select the Windows authentication option.
Operation to Perform: Choose the Export site or list option.
Click OK.&;
The same screen appears as was shown in the third step of the Exporting sites recipe. This time we will export a list item.
Site Collection: Select the site collection where the site is located.
Site: Select the subsite from the drop-down list.
Lists: Choose the Announcements list option.
File location: Enter a name for the file. Check the Overwrite existing files option if appropriate.
Export Full Security: Leave this unchecked.
Export Versions: Leave at All Versions.
Click OK.
How it works...
The operation shown in this recipe works in exactly the same way as the Export sites
recipe. The only difference is that the content database is not
attached to a web application and is accessible through the browser. The
other key difference being that information can be accessed from a
content database snapshot.
Do not confuse unattached with detaching a database
in SQL Server. This is not the same operation and this functionality
will not work on a detached database.
You have the option to pick one of three ways to specify what you are recovering:
Browse Content: This allows you to see the site collections and lists within a content database.
Backup a site collection: Gives the option to back up a site collection.
Export site or list: This is the same as what was shown in the Export sites recipe.&;&;
After the information is retrieved, use the Import sites recipe in order to upload the information to another content database.
There's more...
PowerShell can be used to create a snapshot of the
content database. Snapshots are supported in the Enterprise version of
SQL Server.
Briefly, a snapshot is a picture of the database
frozen in a point of time. It is read only. Snapshots are a great help
for reporting, testing, and updates. It is important to understand that a
database cannot be dropped, detached, or restored when it has a
snapshot.
The following commands show how to create a snapshot.
$spfCDB = get-spcontentdatabase wss_contentdb
$spfCDB.Snapshots.CreateSnapshot